Taking notes with Obsidian
Obsidian is a powerful note-taking application, but with a bit of a learning curve. This post provides a brief overview and detailed setup instructions.
I've been using Obsidian and obnoxiously singing its praises to many friends and acquaintances for about a year now so I figured I should create a post about it to walk through what Obsidian is, why I like it, some key drawbacks and shortcomings, and how to set it up and use it.
This is a really long post, but it's mainly pictures!
By the end of this how-to, you'll have an Obsidian vault that helps you effectively track tasks, and meetings or classes, and for managing personal knowledge and professional relationships.
(P.S. you can download a .zip of the vault at the end of the post for sanity-checking in case my instructions are unclear!)
Table of Contents
- What is Obsidian
a. What is good about it? - How does it work
a. Markdown
b. Zettelkasten
c. How this process is different - Drawbacks
- Starting to use Obsidian
a. Linking
b. Embedding
c. Tagging
d. Frontmatter - Useful plugins
a. Set up necessary folders
b. Set up necessary notes
c. Configuring hotkeys and core settings
d. Configuring settings for plugins - Using your plugins
a. Using Kanban
b. Using Calendar
c. Creating a Meeting/Class
d. Using your Rolodex
e. Using Dataview
f. Using ReaditLater
g. Using Mind Map - Conclusion
What is Obsidian?
Obsidian is a markdown-based notetaking application, that uses the zettelkasten notetaking method.
What is good about Obsidian?
These are the primary reasons I use Obsidian:
- It is an easy way to take notes,
- Taking notes in Obsidian is intuitive,
- The application is flexible and adaptable so I can change how I take notes,
- It is easy to search and find data later,
- The ability to link notes together, and see which notes are linked together, has allowed me to keep a rolodex of people and organizations and effectively manage meetings and interactions,
- It has worked incredibly well for me, and I've done a much better job of taking good notes (I take more/better notes since I know I'll be able to make use of them later),
- It is free, locally hosted, and you can also use Git to manage it and sync across devices (it also has a paid product that lets you sync across devices but I don't like it),
- Large community (which keeps it stable and provides lots of plugins and support)
How does it work?
Markdown
Obsidin uses markdown, which is a type of language formatting. The formatting is most attractive when read through some medium that can interpret the markdown, but unlike formats used by word processors like MS Word, it is still highly legible as a simple text document.
Markdown is a lightweight markup language that you can use to add formatting elements to plaintext text documents. Created by John Gruber in 2004, Markdown is now one of the world’s most popular markup languages.
-from https://www.markdownguide.org/getting-started/
Since markdown is popular and standardized, it is possible to take your notes from Obsidian and keep them as simple text files, or import them into other markdown tools like Joplin.
It might sound daunting if you haven't used markdown before, but it is pretty simple and Obsidian has lots of shortcuts and plugins that make it easier.
Zettelkasten
Zettelkasten is a note-taking methodology. This is a good short blurb on it:
A Zettelkasten is a personal tool for thinking and writing that creates an interconnected web of thought. Its emphasis is on connection and not mere collection...
Zettelkasten note taking was originally facilitated through index cards and filing cabinets (most famously by Niklas Luhmann), but software has made this process even more intuitive.
How this process is different
'Normal' notetaking relies on a hierarchy of folders and useful file names.
Obsidian still uses folders, but connects notes by links and tags, and is enhanced by YAML metadata (if you don't know what "YAML" or "metadata" are, no worries, you don't actually need to to make this useful for you.)
This setup of notetaking allows you to connect notes and thoughts together, and has been tremendously useful for me.
Drawbacks:
- Syncing between devices is kludgy; to sync from within Obsidian you either have to pay for the sync service (which doesn't work that well), or play around with git. You can sync from outside Obsidian in a variety of ways though, including Nextcloud, Google Drive, DropBox, SyncThing, rsync, etc. I'll make a post later on syncing.
- Collaboration isn't great, since it is based on the syncing functionality.
- Obsidian has a bit of a learning curve in order to use it most effectively (although hopefully this post helps with that!). For me, this meant that I had to tweak my process a few times to get a setup that I liked. Happily Obsidian is pretty forgiving of changing your note-taking style, but it is still a drawback.
- I can tend to collect too many notes with Obsidian, but I'm figuring out how to manage that better. Yes, this is a 'me' thing, but I think Obsidian's design incentivizes taking notes and sometimes can lead to taking too many.
Setting up Obsidian:
Obsidian is really easy to install, it is just an executable that you can run on Windows, Linux, or macOS (they also have an iOS and Android app). Download and run from their website:
Creating and Opening Vaults:
After you first open Obsidian, you'll see an image similar to this:
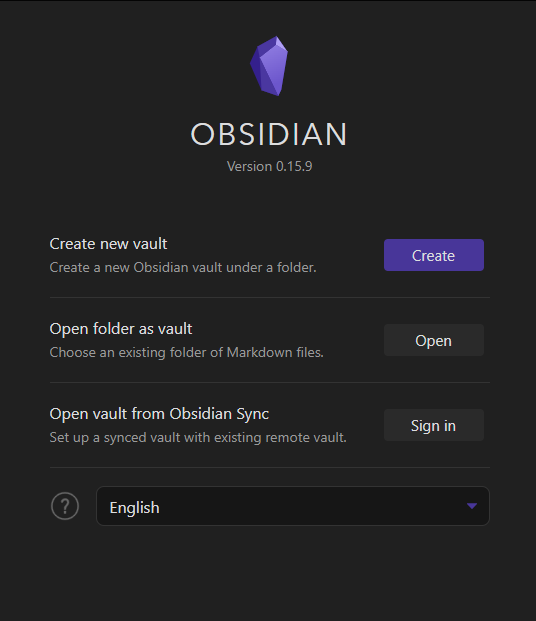
Obsidian stores all notes in "Vaults." Vaults are just folders that Obsidian tracks. All of your notes and folders are stored inside that 'Vault' folder.
Select "Create new vault", browse to the location where you want to store your Obsidian vault, and then create the vault with whatever name you want the Vault to have. Obsidian will create a new folder with that name.
You should now see something like this (but without the red text):
Starting to use Obsidian:
Great, so we have an Obsidian vault, but now let's start playing around with it and seeing how Obsidian works. There are four fundamental capabilities you need to know:
- Linking,
- Embedding,
- Tagging, and
- Frontmatter
Create two notes and name them whatever you want (I'll be using "Note1" and "Note2" in my example).
Then, right-click on one and select 'Open in new pane" and you can have two (or more) notes open at once.
In one of the notes, make a couple lines starting with one or more pound/hash signs followed by a space and then some text (something like ## Test). That is how markdown defines different headings in a document. We'll use all of this in a moment!
Linking:
Linking connects notes, and is core to Obsidian.
You can link to a note by encasing the note's name in double square brackets. Happily, you can just type two open square brackets [[ and Obsidian will autocomplete the rest for you!
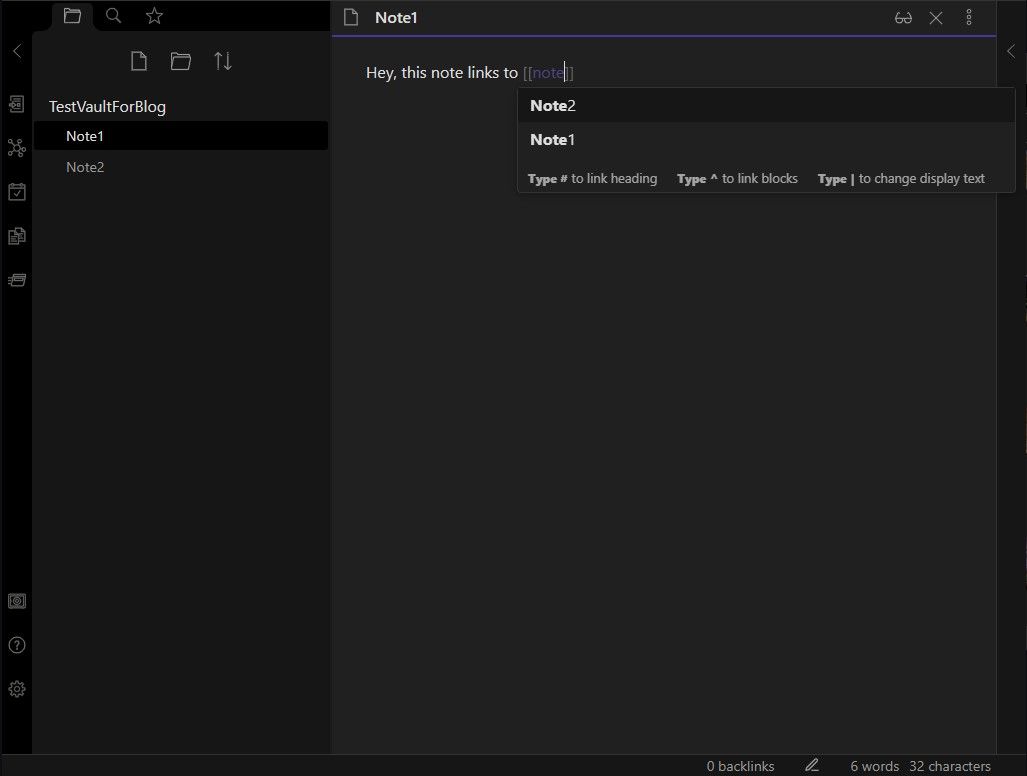
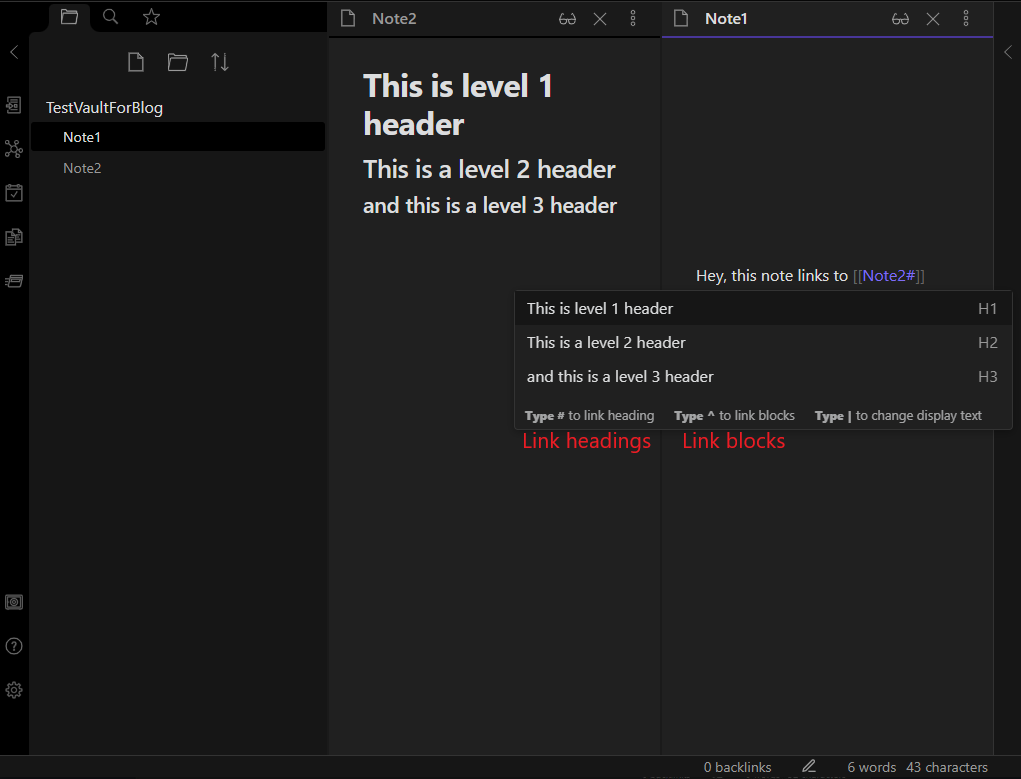
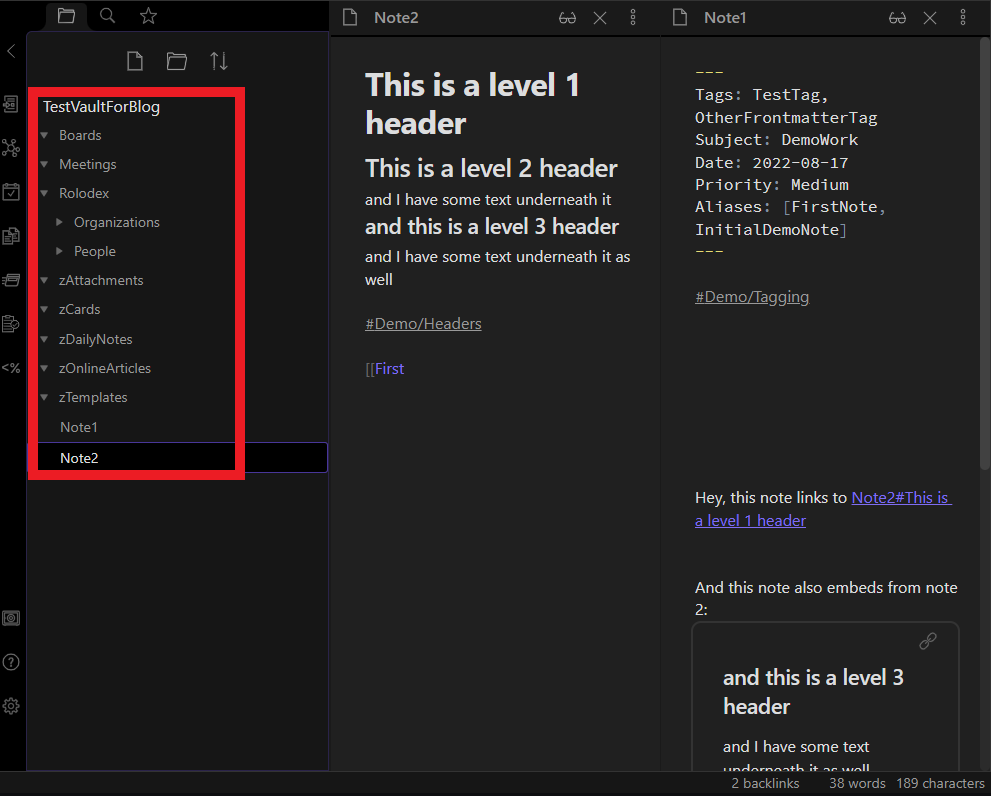
However, there may be times that you want to link to just one section of a note, not the whole note. That's very possible! The image below shows linking to a specific heading in a document with the # character. You can also link to specific lines using the ^ character.
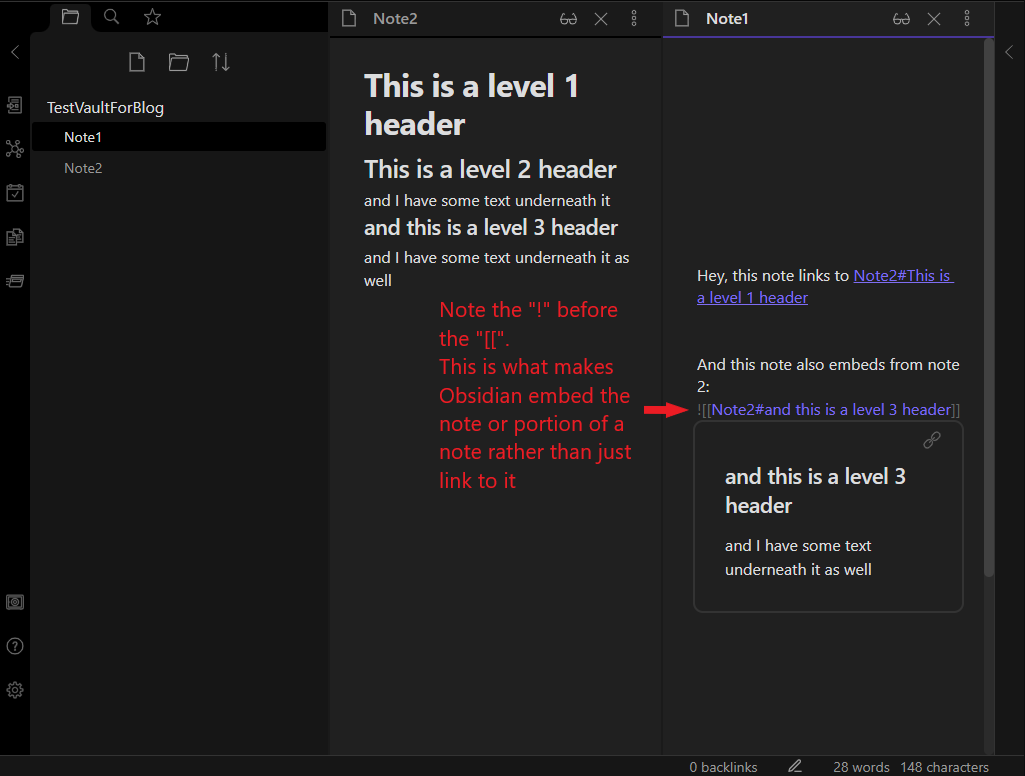
Embedding:
Embedding is almost identical to linking, but it will actually embed the content of a note (or a portion of a note) inside another note. To embed, you'll just put an exclamation point before the square brackets you use for linking:
Tagging:
Tags are the simplest part of Obsidian. You can create tags by putting a # sign right before text (remember that if you put a space after the pound/hash it will become a header, not a tag).
You can also create nested tags! So, in the image below both Note2 and Note1 are tagged with "Demo" but only Note1 is tagged with "Demo/Tagging".

Frontmatter:
You can get a ton of value out of Obsidian just through linking, embedding, and tagging notes. But using frontmatter in Obsidian can open up much more capability as well! We'll use it when we start using Dataview.
Obsidian tracks some file metadata (date/time it was created, date/time last modified, how many characters are in the file, tags, links, etc), but Frontmatter allows you to create arbitrary metadata for files.
Frontmatter has to go at the very front of the note, and is started and closed with three hyphens.
In the below example I created a block of frontmatter that accepts data for "Tags", "Subject", "Date", "Priority", and "Aliases".
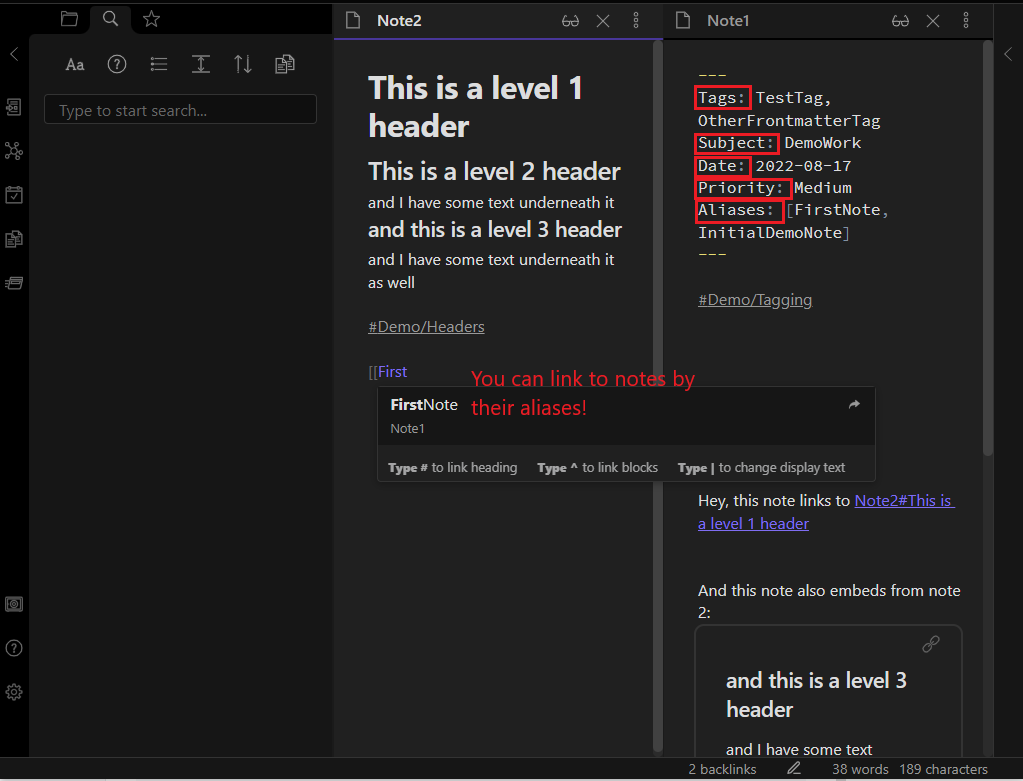
You can use the "Tags" key to add a comma-separated list of additional tags. And the "Aliases" key allows you to specify multiple names for a note. For me, this is super useful in the rolodex I keep since it allows me to easily adapt to changing team names.
For example, if I used to have a note for the "Risk" team but then they rebranded to "GRC" I can just give my "Risk" note an alias of "GRC." That way I can keep track of historical name changes for teams and not get confused a few years down the road if someone mentions the "Risk" team; I know that "Risk" and "GRC" are the same.
Some of the plugins that we are about to walk through allow much more powerful uses of frontmatter.
Useful Plugins:
There are a few plugins that I've found especially useful:
- Kanban
- Templater
- Dataview
- Calendar
- Periodic Notes
- ReaditLater
- Frontmatter Tag Suggest
- Mind Map
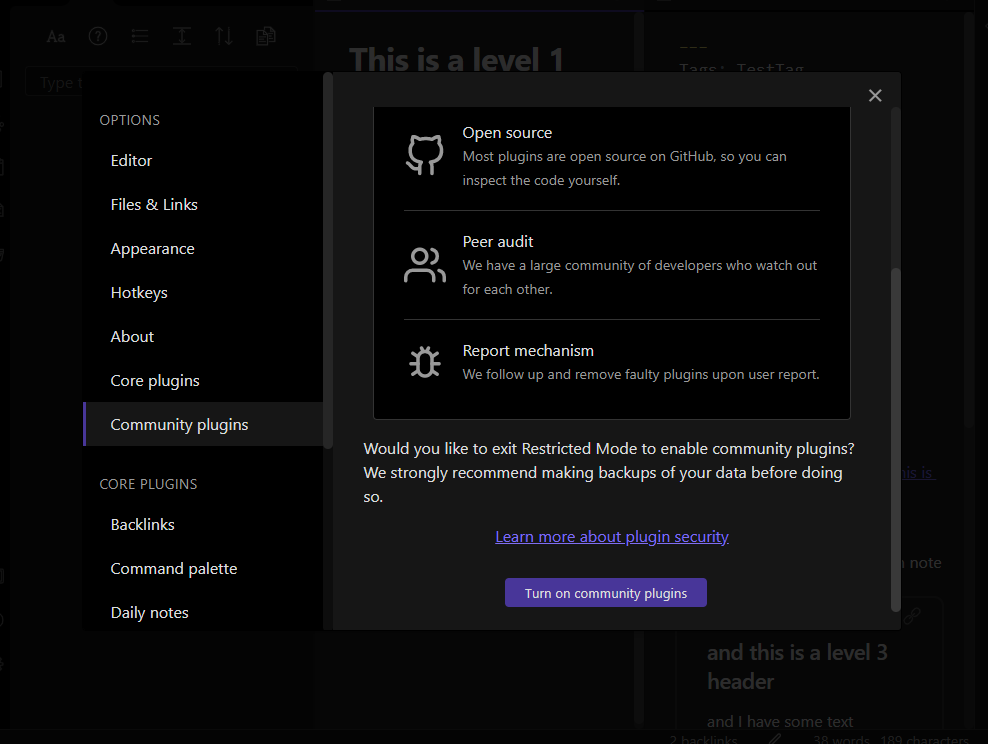
To install the plugins, open up the settings (the gear icon in the bottom left), go to "Community plugins" and turn on community plugins:
Then click "Browse" and search for the plugins I listed above. To install a plugin you'll need to first click "Install" and then "Enable."
Set up necessary folders:
In order to effectively use these plugins, you'll need to configure some settings.
First, let's set up some folders we're going to need:
Some 'background' folders
- Create a zTemplates folder
- This will store all of your templates, you'll point your template plugins to this folder to fetch templates.
- Create a zAttachments folder
- This will store any attachments, you'll point to this in settings "Files & Links".
- Create a zDailyNotes Folder
- This will hold your daily notes, and you will usually access those through the calendar, not through this folder which is why it is in the background.
- Create a zCards folder
- This will hold your kanban board cards. Again, you'll usually access these notes through your kanban board rather than this folder.
- Create an zOnlineArticles folder
- This will hold the articles pulled by ReadItLater.
Some 'useful' folders
- Rolodex
- People
- Organizations
- Boards
- Meetings
Your vault should now look like this:
With the necessary folders created, now let's move on to configuring some necessary notes.
Set up necessary notes:
Under the zTemplates folder, we're going to create some notes:
- DailyNoteTemplate
- CardTemplate
- MeetingTemplate
- PersonTemplate
Now populate those notes with the following data. You can modify these as you desire, but this is a good starting point. Also, if you see any "```" marks when you copy this data over, you'll need to remove those.
DailyNoteTemplate
In this note, put in:
# Events
# Tasks
# Meetings/Classes
# Notes
CardTemplate
In this note, put in:
---
Created-on: <% tp.date.now("YYYY-MM-DD") %>
Tags:
Priority:
Due-date:
Urgent: True/False
---
# Task
# Subtasks
# Updates
MeetingTemplate
In this note, put in:
---
Date: <% tp.date.now("YYYY-MM-DD HH:mm") %>
Organizer:
Attendees:
Recurring: True/False
Tags:
---
<% await tp.file.move("/Meetings/" + tp.file.title) %>

# Goal
# Content
PersonTemplate
In this note, put in:
---
Aliases: []
---
<% await tp.file.move("/Rolodex/People/" + tp.file.title) %>

# Works with:
# Team/Org:
# Previous work with them:
# Contact info:
# Notes:
Now that we have the necessary folders and notes created, we can move on to configuring the settings.
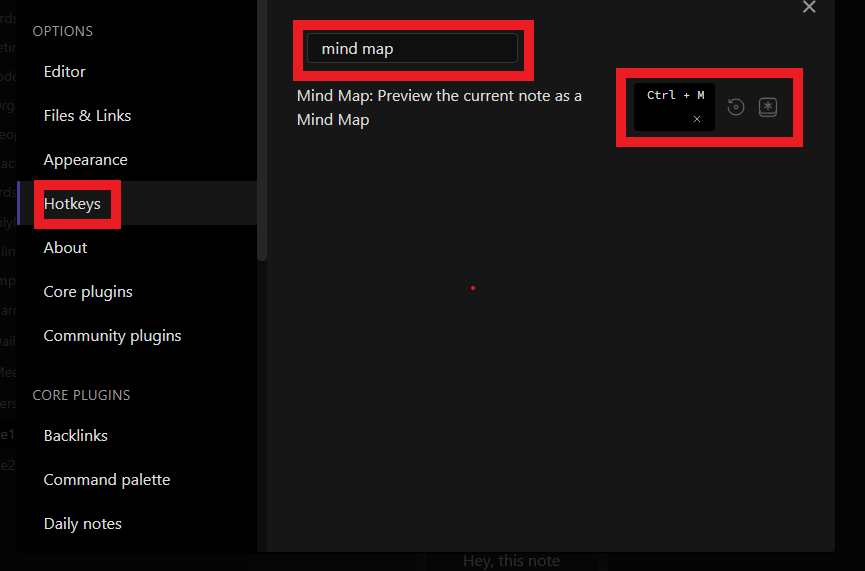
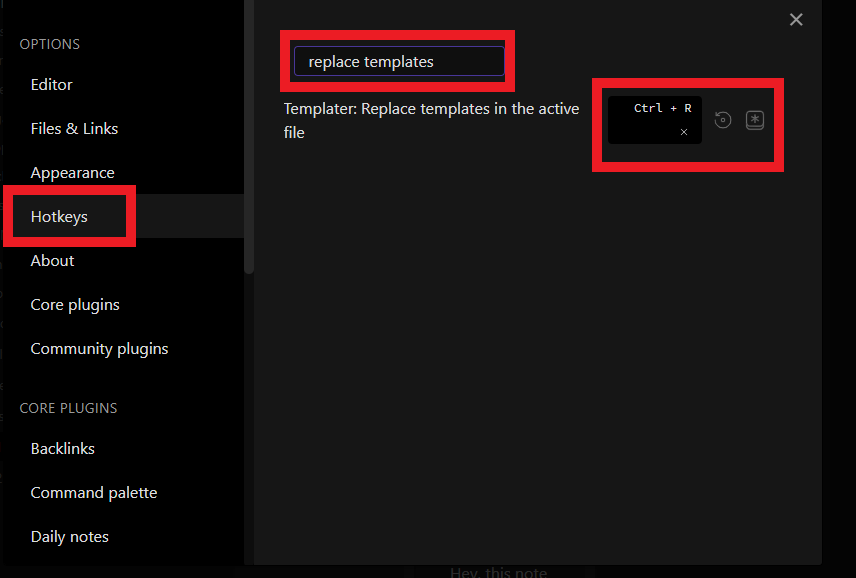
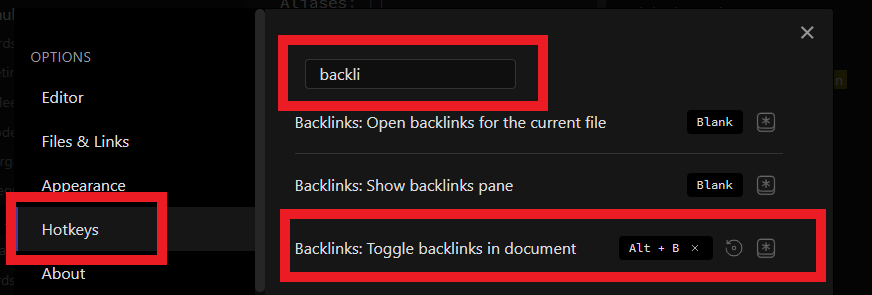
Configuring hotkeys and core settings:
Hotkeys
Under Settings, go to the "Hotkeys" menu item and add the following keys for Mind Map, Templater, and Backlinks (to change the hotkey click on the little square with an asterisk inside it and then enter the key combo you want for the hotkey):
Core Settings
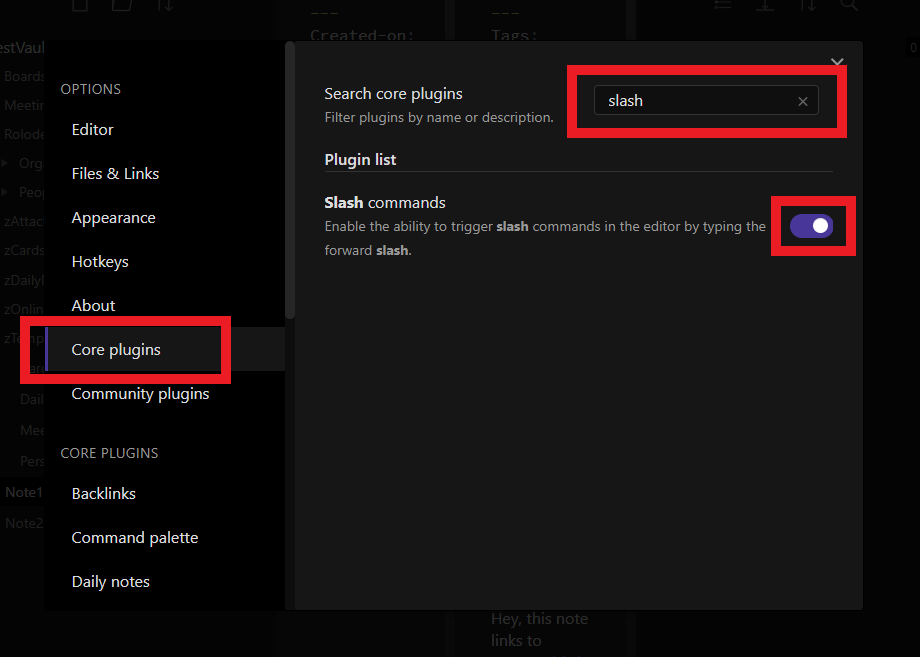
Enable slash commands by going to "Core plugins" under settings and toggling "Slash commands" to on as seen below:
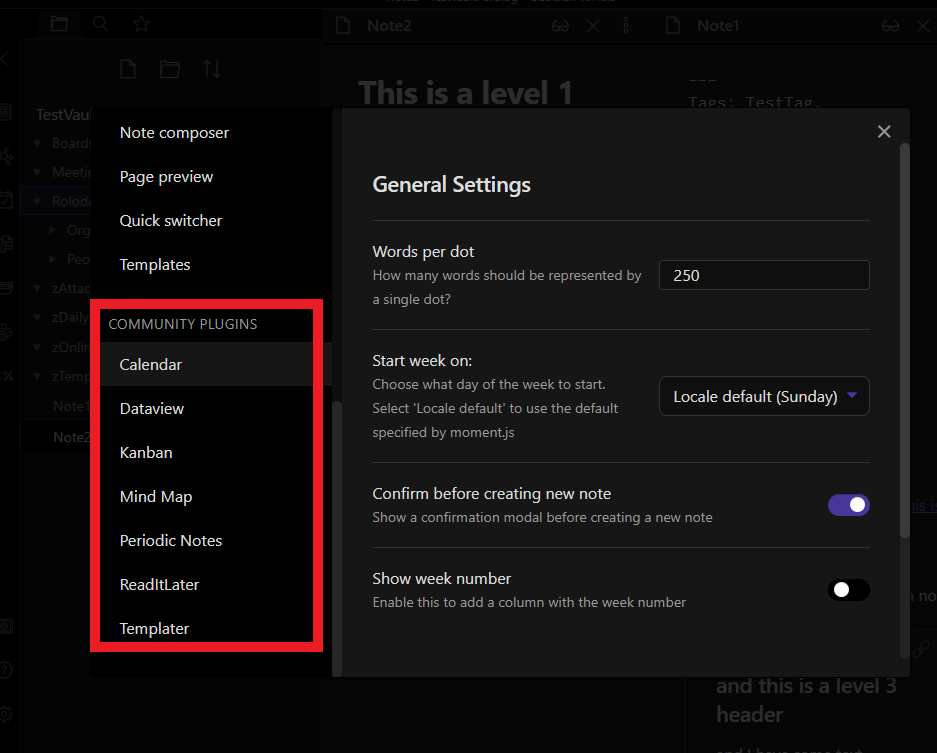
Configuring settings for Community Plugins:
Open up settings again and scroll to the bottom and you'll see that you have a number of menu options under "COMMUNITY PLUGINS." Each of the plugins you have installed has options here. Let's configure those now.
Calendar
No configuration needed!
Dataview
No configuration needed!
Kanban
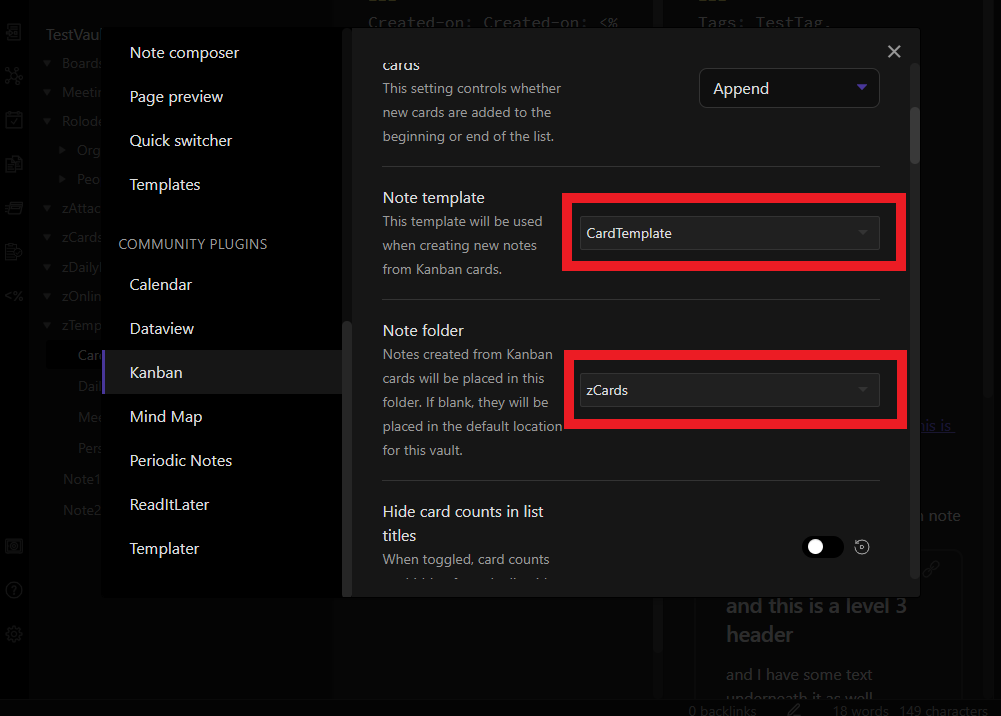
Under Kanban, modify the "Note template" and "Note folder" settings to use the CardTemplate note and zCards folder as shown below:
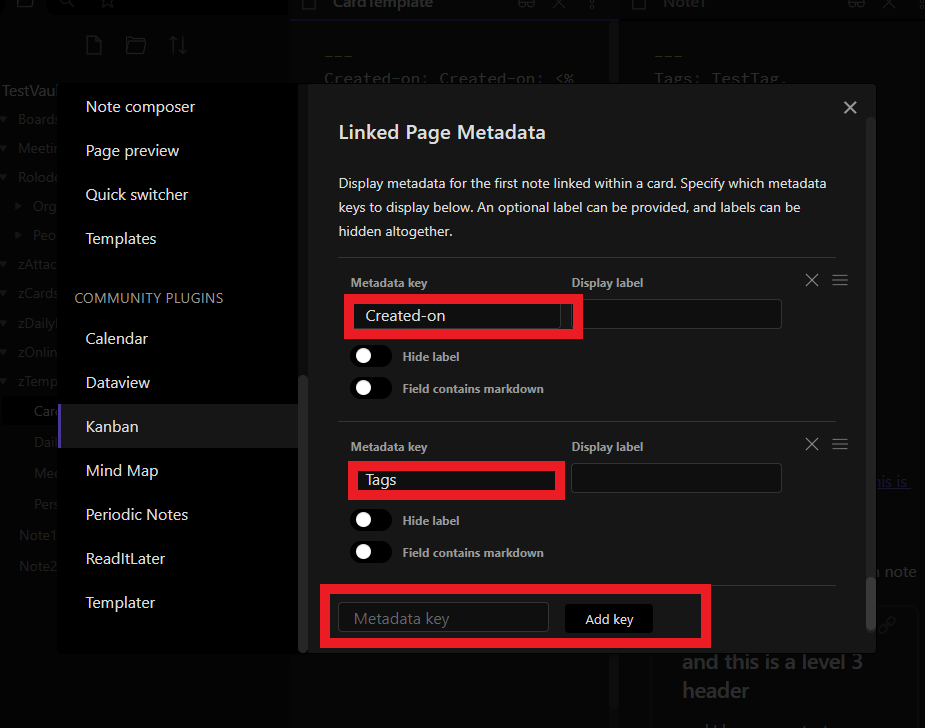
Finally scroll down to the bottom of the Kanban settings to the "Linked Page Metadata" setting and add in the "keys" from the frontmatter of the CardTemplate note. In the example below I've added the first two:
Periodic Notes
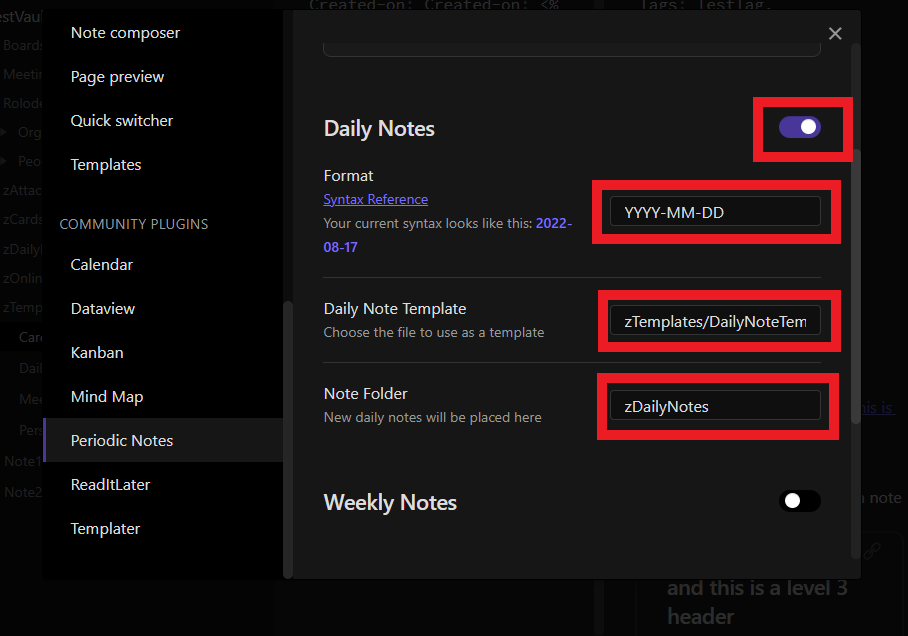
Under Periodic Notes, toggle the "Daily Notes" to on, and then leave the "Format" setting as is, while adding in your DailyNoteTemplate to "Daily Note Template" and your zDailyNotes folder to "Note Folder" as shown below:
ReaditLater
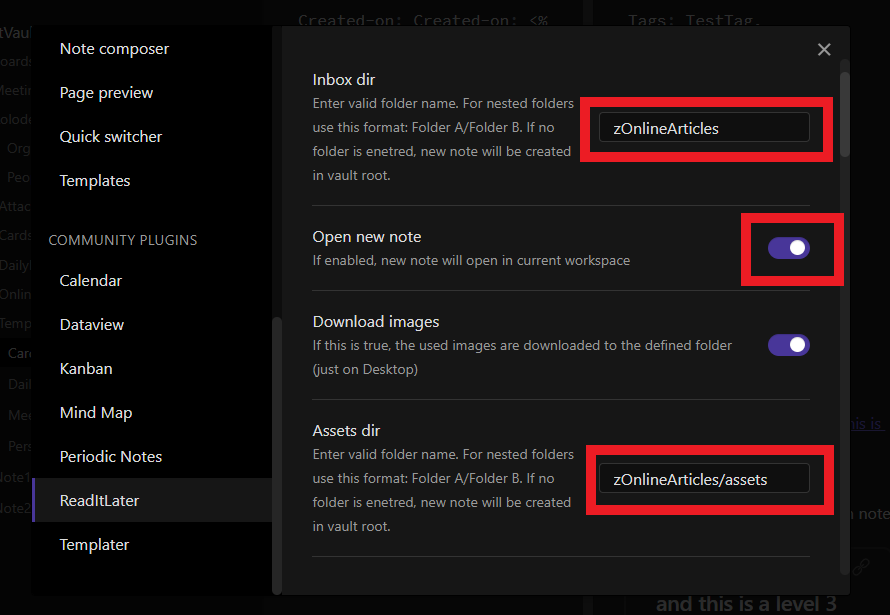
Under the ReaditLater configurations, set the "Inbox dir" to your zOnlineArticles (this doesn't autofill, unfortunately, so you'll need to type the whole thing in), toggle "Open new note" on, and update the "Assets dir" to be under your "zOnlineArticles" folder as shown below:
Frontmatter Tag Suggest
No configuration options available, so no changes necessary.
Mind Map
No configuration changes necessary.
Templater
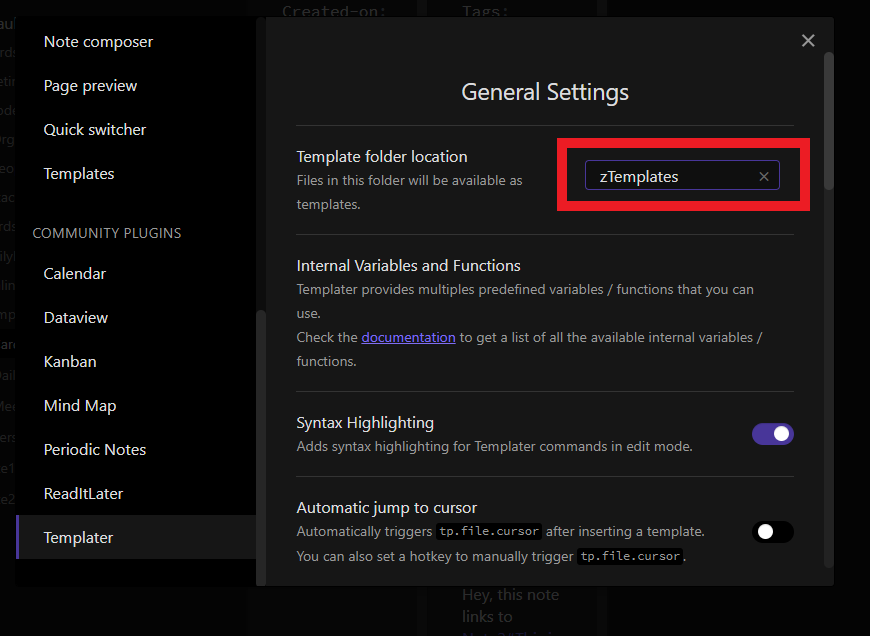
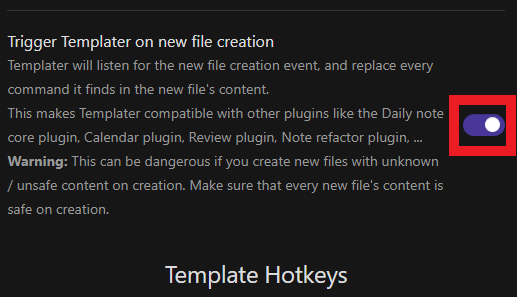
Modify the "Template folder location" value to to your zTemplates folder, and set "Trigger Templater on new file creation" to on as shown below:
Templater is very powerful, so you'll want to revisit the settings later to add more functionality, but this is sufficient for right now.
Using your Plugins:
Alright we are at the final step! All of the work that you've done is going to come together really quickly into a neat product.
Using Kanban:
A Kanban board is a way of tracking and managing tasks. And the Kanban plugin you installed and configured earlier can help manage time and keep track of tasks.
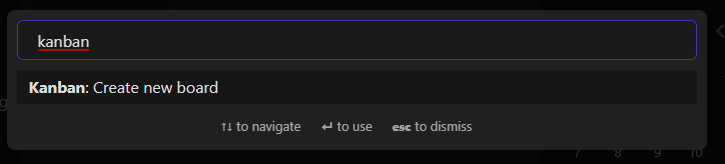
Open the Command Palette (it is one of the icons on the far left of Obsidian; it looks a little bit like a banker's box) and create a Kanban board by typing in "Kanban":
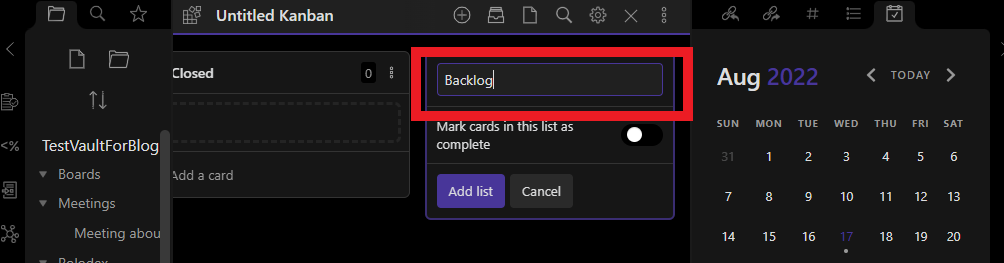
Once you create the board, you will need to create some lists. I like to use the following lists:
- "Begun"
- For tasks I have just begun.
- "In-progress"
- For tasks that are meaningfully underway.
- "Delayed"
- For tasks that have been delayed (by me, or by circumstances).
- "Waiting on others"
- For tasks that are waiting on input from others.
- "Closed"
- For tasks that are done!
- "Backlog"
- For tasks that I'm not working on, but need to not forget.
Once you have created whatever lists you want, you will want to populate them with some "cards." Click the "Add a card" button on one of your lists and type in the name of a task (e.g. "Learn how to use Obsidian").
Now rename your board from "Untitled Kanban" to something better, and drag that note into your "Boards" folder.
Next, click on the three dots on the right-side of that card and click the three-dot menu and select "New note from card" like below:
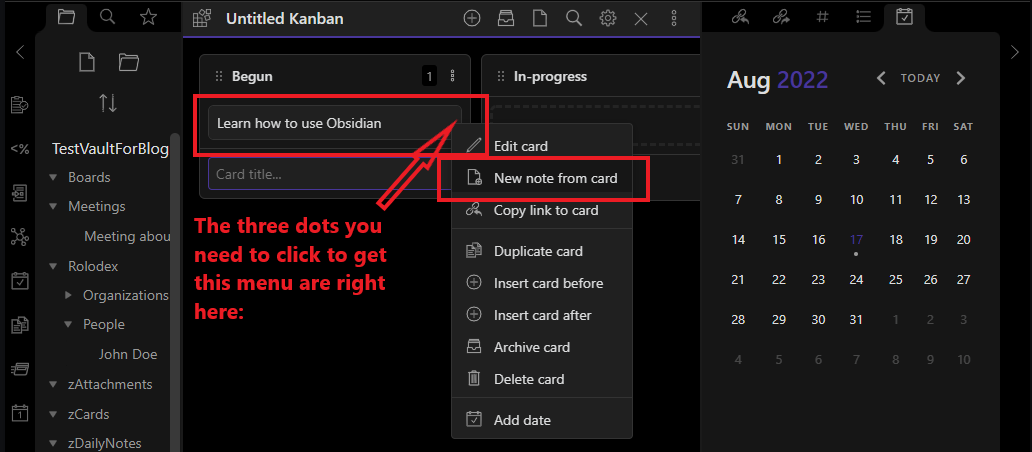
This creates a new note, moves it under your zCards folder, and populates it with whatever you put into your CardTemplate note. You should see something like this:

I added in some checkboxes (with - [ ] ), but other than that you should see very similar content.
Note how the "Created-on" key shows up on your "Learn how to use Obsidian" card. That is because you added those metadata keys into the settings for the Kanban plugin in step 5.d! You can link cards to each other to chain projects together and define dependencies, and you can also embed specific content from meetings or classes into your cards.
This is really useful for keeping track of a specific task or project!
Using Calendar:
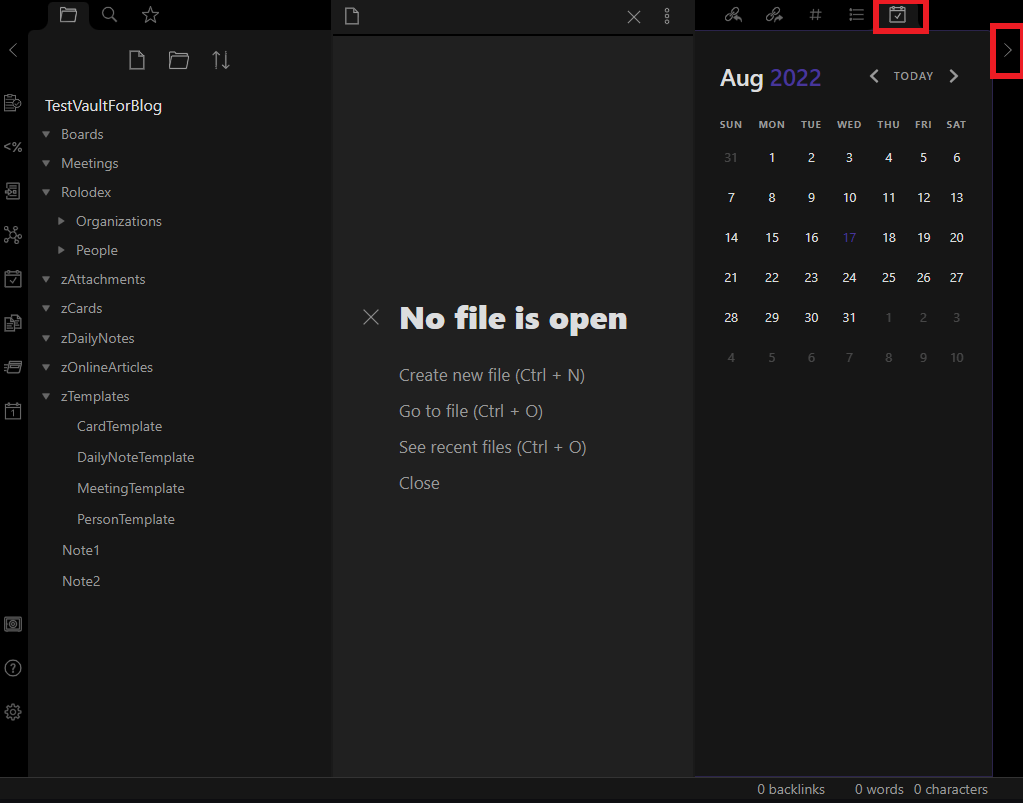
Expand the right-hand side menu and click on the little calendar icon so you see the view below:
Then click on today's date (the one highlighted in purple). After you are prompted to create the note for that date, you should see a view like this:

A few things to note!
First, the text of the note was created based on what you had created in your DailyNoteTemplate from Step 5.b above. You can tweak the content of that template to change the content that is auto-populated to your daily notes in the future.
Second, because of the configuration tweaks we made earlier, Obsidian knew to create the note and then drop into your zDailyNotes folder. You can access your daily notes from that folder, but I recommend just accessing your notes through the calendar in the future. Days that have notes associated with them will have a dot under the date, as you can see in the right-most highlight above.
Creating a Meeting/Class:
I'll create a blog post later explaining how to automatically create neatly-formatted meetings with just a button-click, but we'll use a simple and manual process here.
Under the Meetings/Classes header, try to embed a file that doesn't exist. You should see something like this:
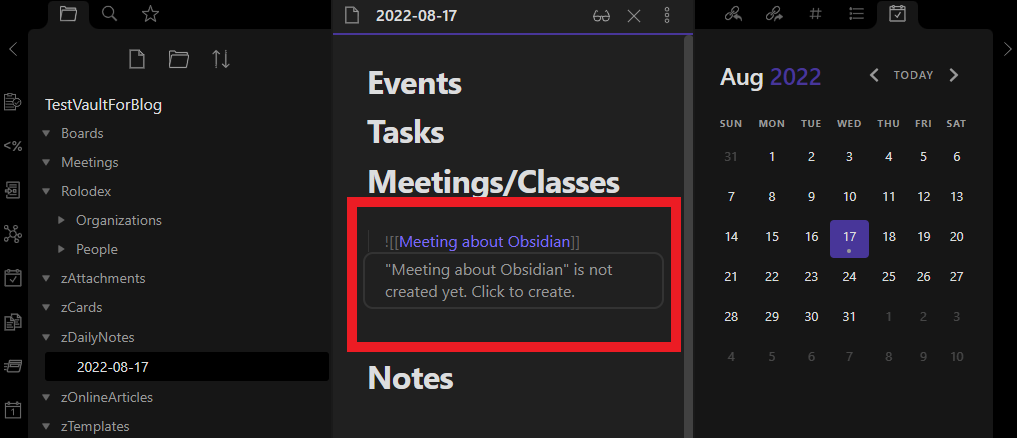
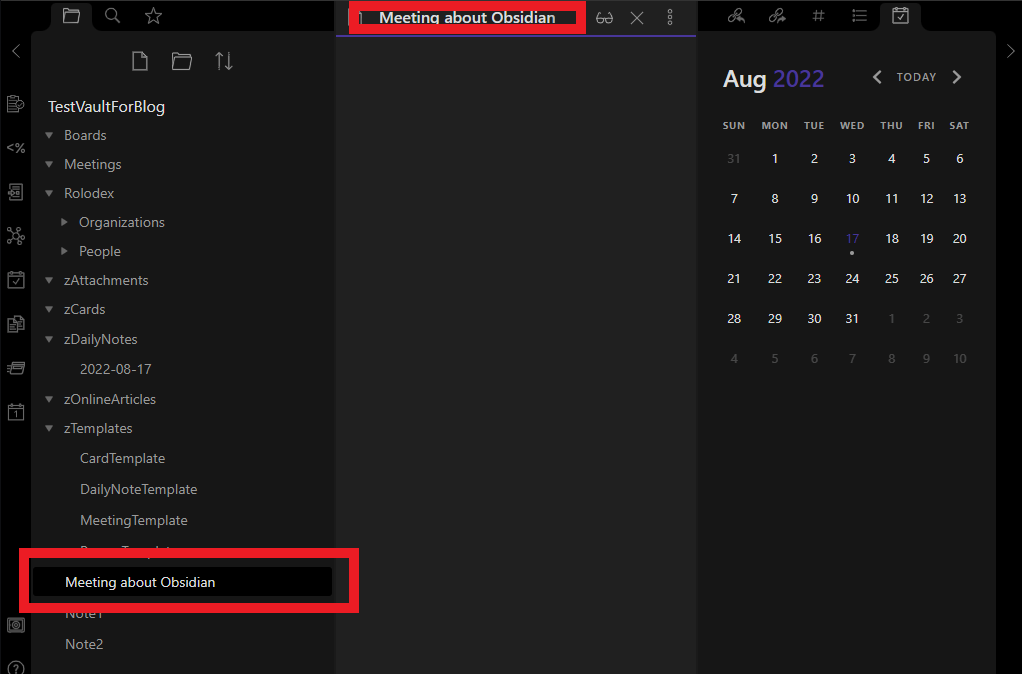
Click in that text blob to create that note. Observe that the file is created, and that it is dropped initially in your root folder for the vault.
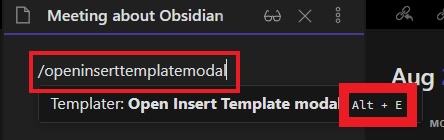
Now either use the hotkey of Alt+E, or use a slash command as seen below to insert a template from Templater. Then from the drop-down menu select the meeting template.
Alright, not only did you insert the content, but the note actually jumped to your "Meetings" folder!
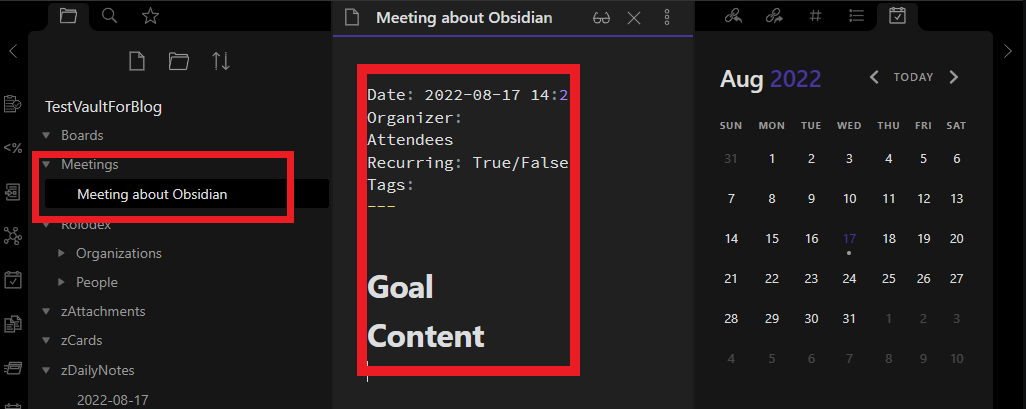
That's because of this line in your MeetingTemplate: <% await tp.file.move("/Meetings/" + tp.file.title) %>
That "tp." prefix calls Templater, which then moves the file to the Meetings folder. Templater is crazy powerful, and you can read the full documentation here if you want to make better use of it.
Additionally, because you installed the "Frontmatter Tag Suggest" plugin earlier, Obsidian will now autocomplete any tags you start to write into the "Tags:" field of your frontmatter!
Using your Rolodex:
A rolodex is a 1950s-era device to keep track of contacts. In Obsidian we can create a very powerful modern version.
Create a new note and give it the name of a person you work with (coworker, boss, student, classmate, etc). Following the same process as above, insert the PersonTemplate (Alt+E, remember?).
Again, because of the templater information you had in your PersonTemplate, once you insert the template Templater moves the note to your Rolodex/People folder.
Now, click on today's date in the calendar view (you did this and created a note earlier in this how-to). You should now see something like this:
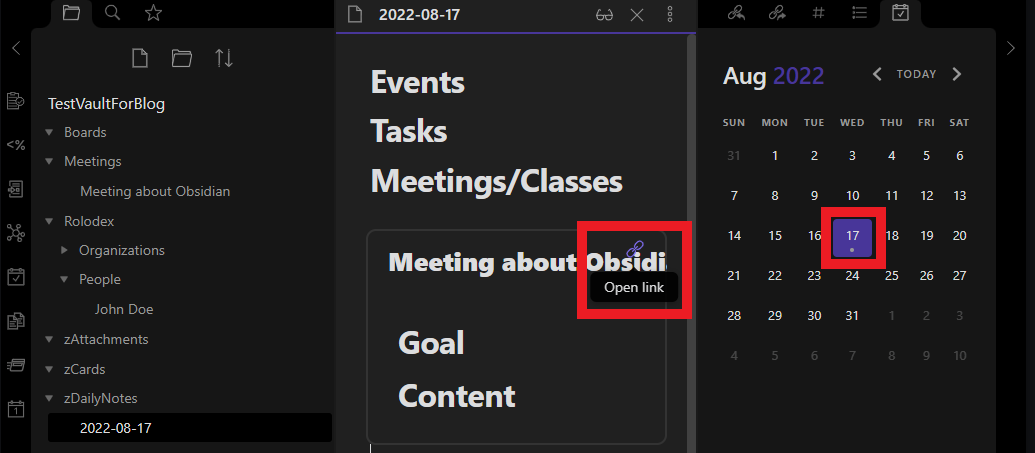
Click the link icon on your embedded meeting to go to that note. Once there, write some text and link to the person you created (for example, I write down "Discussed Obsidian with [[John Doe]]"). You could alternatively do this with a card you created in your Kanban board.
Then go back to the person you previously created in your rolodex, and press Alt+B (to toggle on the backlink view).
You should see a view like this:
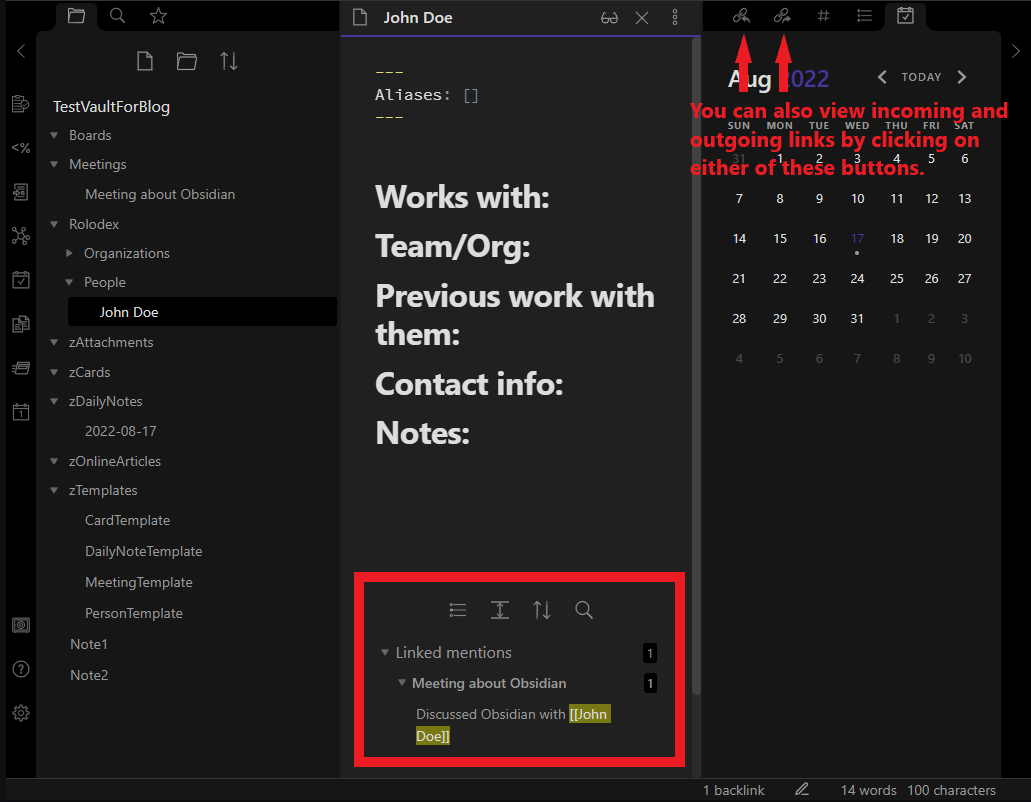
You can now see a list of every other note that links back to this one (you can also use the graph view to see all of the relationships between notes).
This is pretty cool, but we can do even better!
Using Dataview:
Dataview allows you to run advanced queries on your notes. It uses YAML frontmatter heavily, but isn't solely dependent on frontmatter.
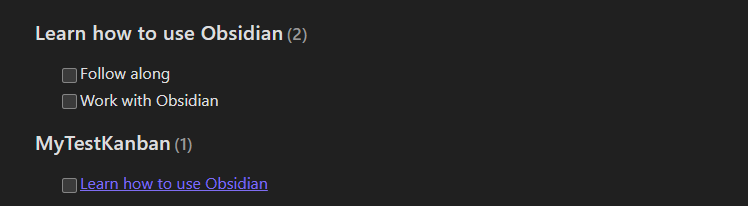
I often want to keep track of all open checkbox items I have. Dataview can pull any items from my whole vault and present them very neatly.
For example, the following block:

Will render as:
Pretty cool! But let's walk through that:
The first line of ```dataview tells Obsidian to interpret the block as dataview content.
The second line of TASK tells dataview that you want to get all tasks (any items with that checkbox in front of it).
The third line of WHERE !completed tells dataview that you only want the ones where the task has not been completed.
And the fourth line of GROUP BY file.name tells dataview that you want to group the tasks by the name attribute of the file.
And finally the last line closes the code block.
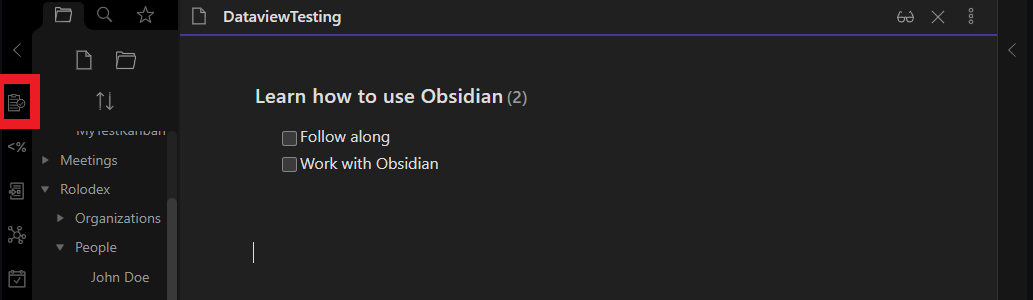
Interestingly, any open tasks in your Kanban will also show up here! Alternatively, if you wanted to exclude any cards from your Kanban you could use the following block:

Like Templater, Dataview is extremely powerful. You can use dataview to give you tables and lists of notes that meet specific criteria. It's very useful!
Using ReaditLater:
Finally, ReaditLater is a powerful tool to archive online articles for later reading or review. If you're like me you clutter up your browser with excess tabs of things you don't have time to read right now but don't want to forget. ReaditLater takes (some of) that clutter away.
Merely copy a website's URL into your clipboard (where your computer stores things between copy and paste) and click on the ReaditLater icon (it looks like a clipboard) highlighted below:
TheProductiveEngineer has a good beginner's guide on using Obsidian. Let's use that as a first test. First, copy the link, and then just click on the ReaditLater icon:
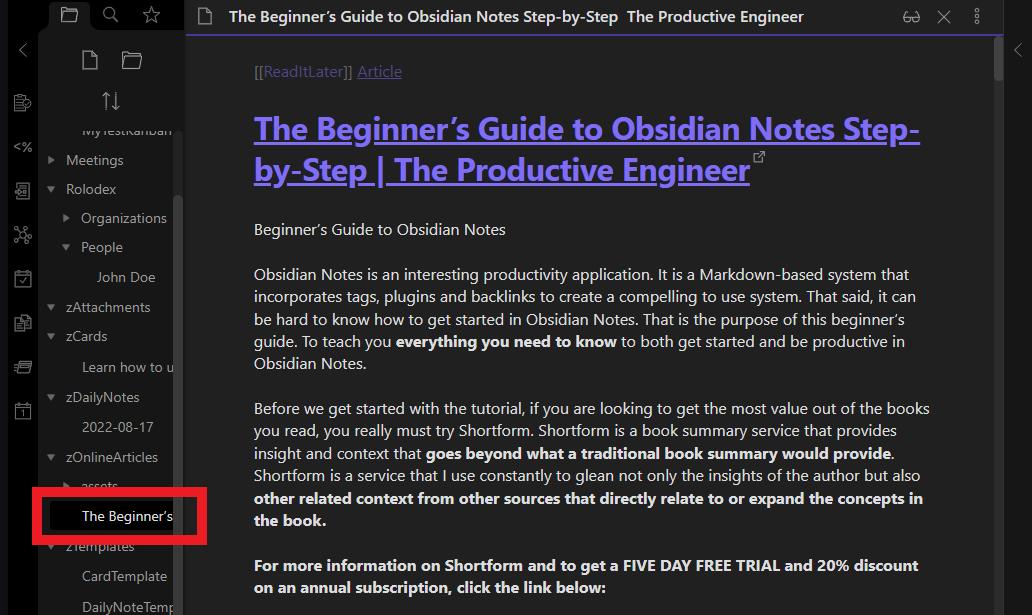
The plugin scrapes the page, converts the data to markdown, and creates a note for you under your zOnlineArticles folder! As an added benefit, this can also get around article-limited paywalls since the site is scraped without sending any of the cookies that track how many articles you have read so far.
You can add even more value by telling ReaditLater to add frontmatter into your articles. For example, I've added the following block into my ReaditLater settings:
---
Date-Added: <% tp.date.now("YYYY-MM-DD") %>
Source: Readitlater
ContentType: Article
Tags:
---
This allows me to track when I pulled down an article, as well as any tags I assign the article!
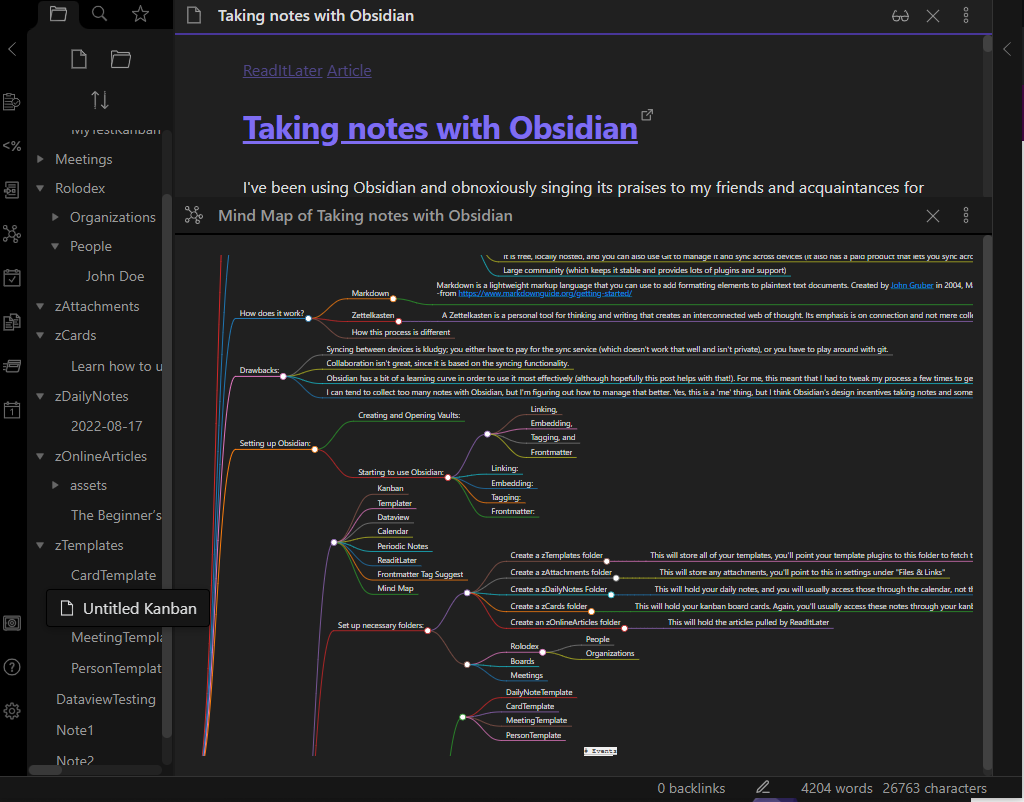
Using Mind Map:
If you press Ctrl+M on any given note the Mind Map plugin will open up a map of the article based on the header hierarchy. This is how this article looks when downloaded with ReaditLater and opened up in Mind Map:
Conclusion
I love all of the functionality that Obsidian has, and the way that it has improved my note taking. The Kanban board and rolodex have been huge for me.
You can also tweak the themes under the "Appearance" setting to make your vault more attractive or easier to read (I like Obsidian Nord).
Hopefully this has been a consumable post despite the flood of information. You can ping me TwelveTablesBlog [at] protonmail.com if you have questions about any of this! I'll be doing another post on some more features of Obsidian and specific uses for Templater and Dataview, so let me know if you have anything you want addressed in a follow-up post and I'll try to add it in.
And, as promised, here is the link to the .zip. You'll need to extract it and then open the vault with Obsidian:
Photo from Obsidian.md